Get started with Simple API
Learn how to convert files using the Conversion Service Simple API. Process files in one API call. Convert documents individually with a blocking call until the API delivers the converted files. Implement the Conversion Service with multiple applications, each with a dedicated API. Each application can include different Workflows and Profiles. Convert large files (larger than 100 MB) using the plain HTTP input endpoint of the Simple API.
The Conversion Service provides various predefined Simple API connectors. This getting started guide explains how to convert files using the Archive PDF/A-2 connector. You can find the complete list of other connectors in the Integrations tab of the Conversion Service Configurator (review the following screenshot).
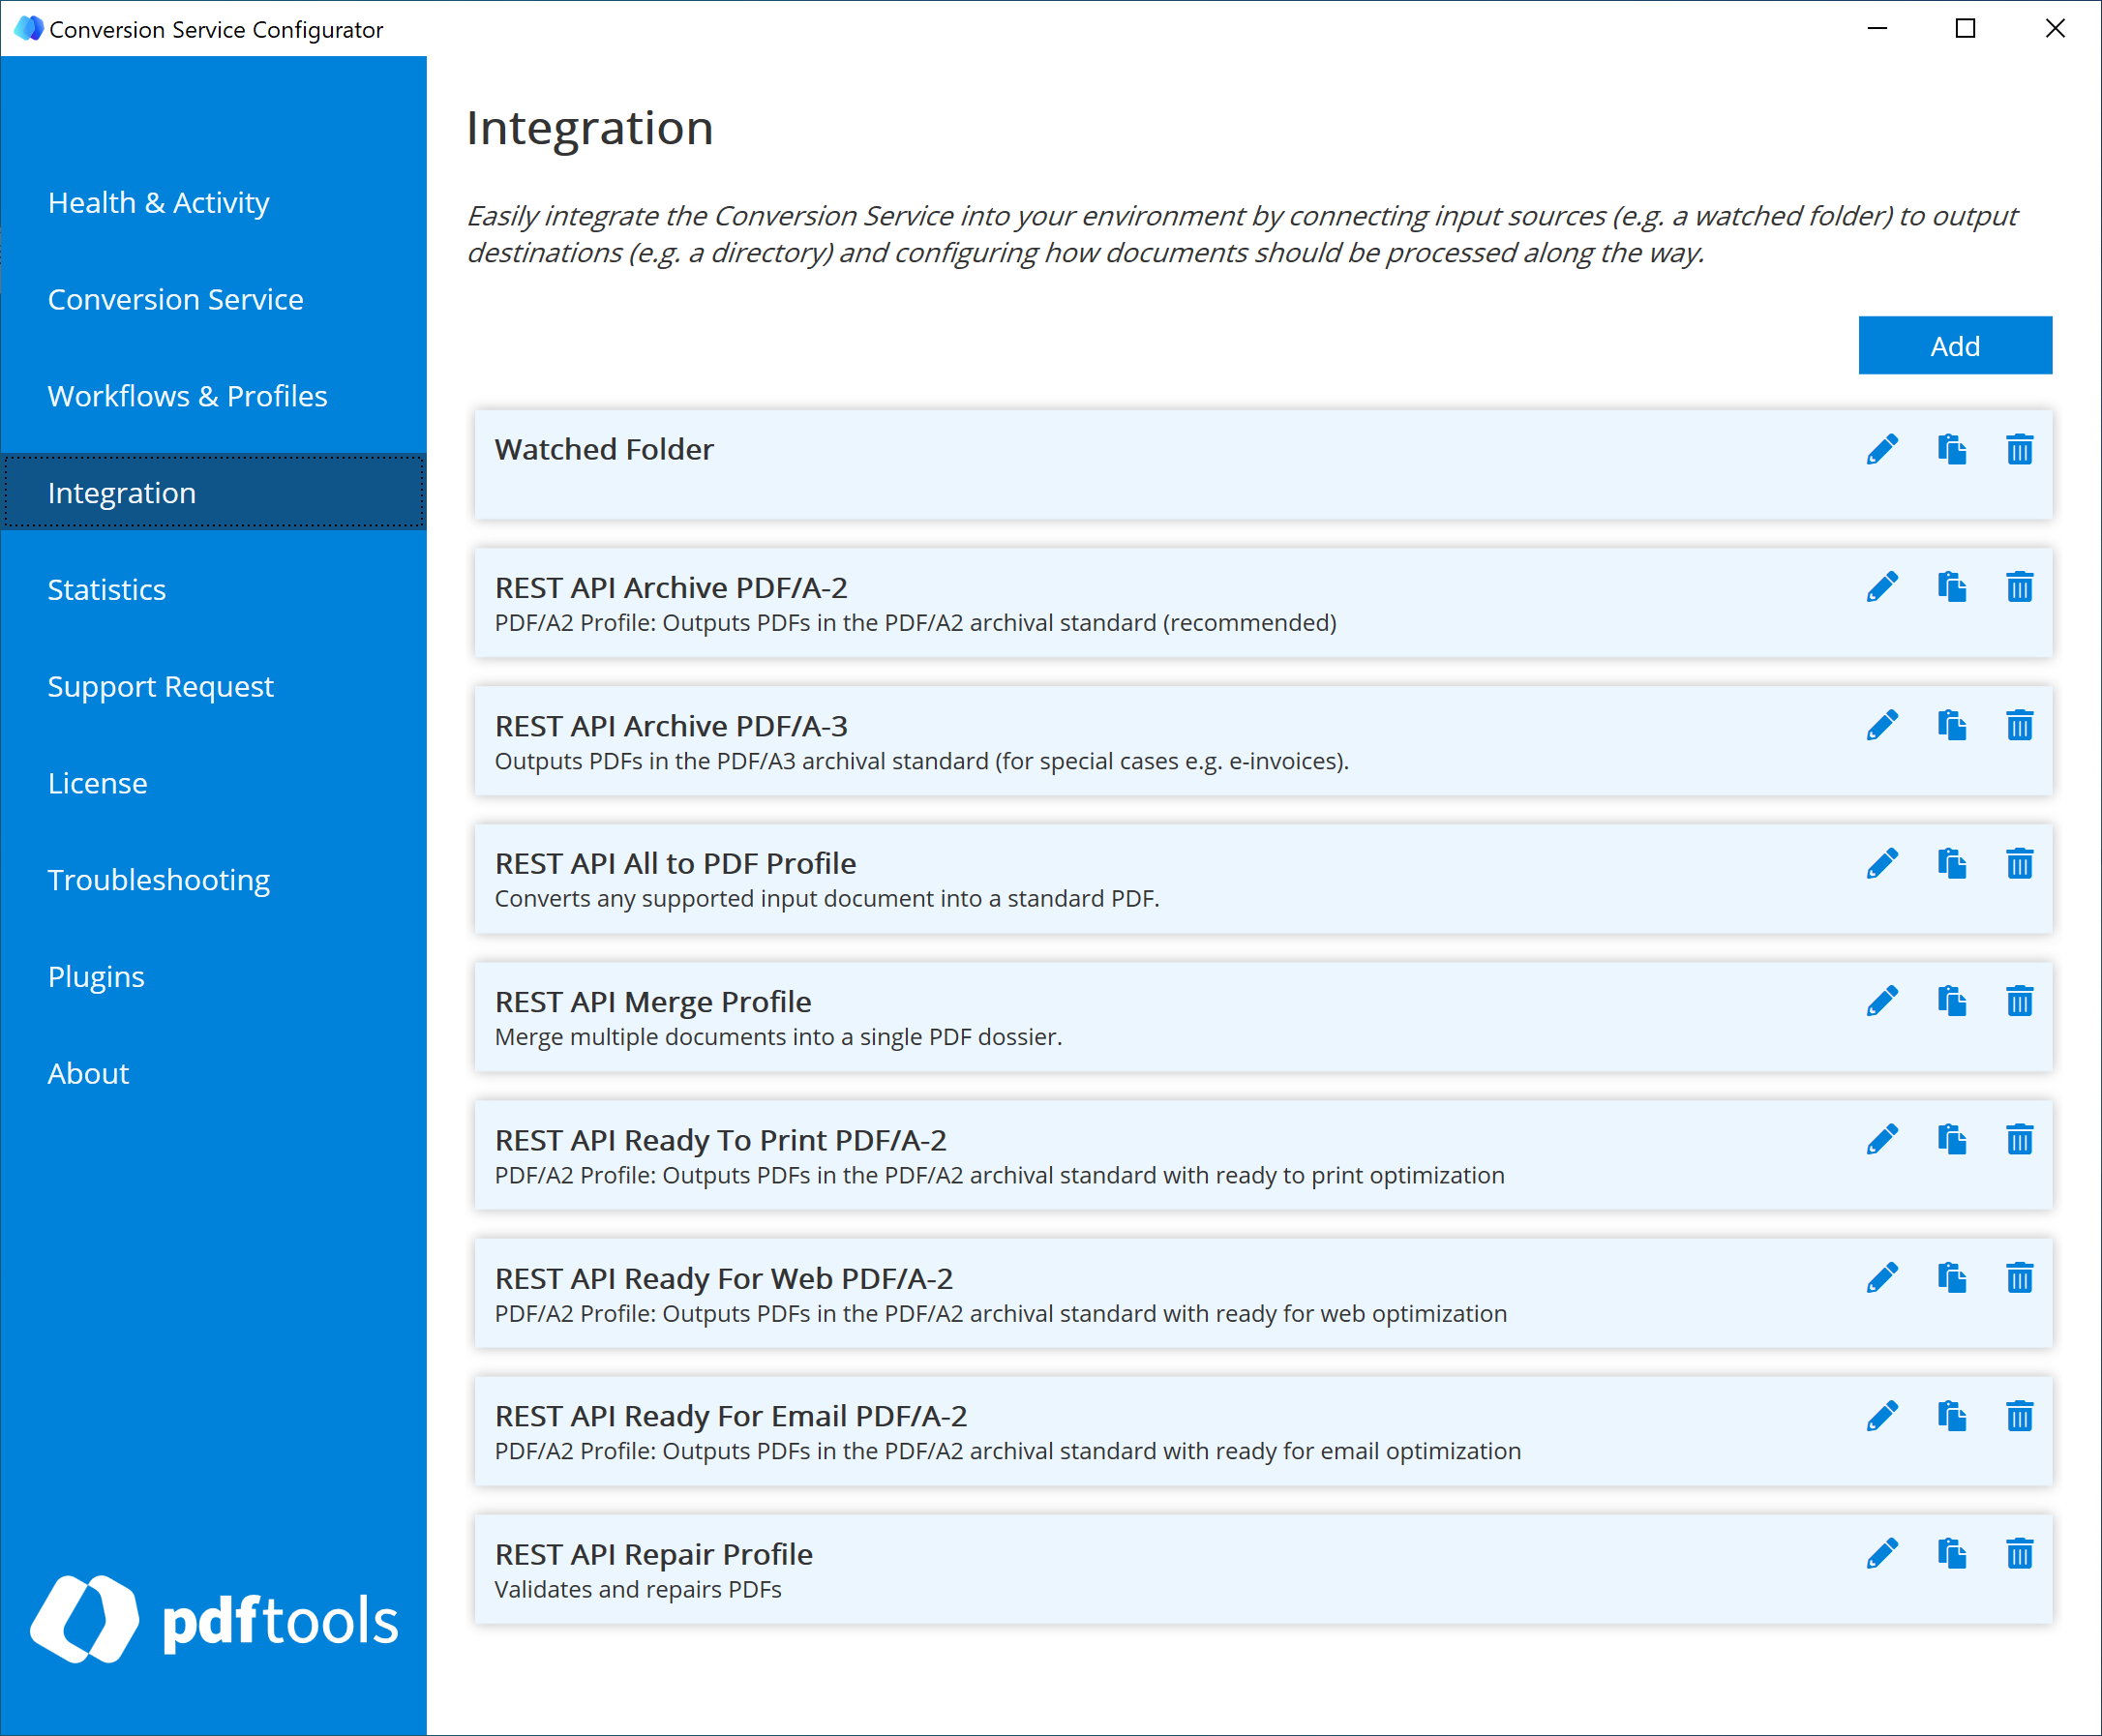
Note that in the Conversion Service Configurator, all of these connectors include REST API in their name. However, this REST API wording is not included in the API references or in the Postman collection. For example: Archive PDF/A-2 in the Postman collection or API references is REST API Archive PDF/A-2 in the Conversion Service Configurator.
Prerequisites
To use the APIs explained in this documentation, fulfill the following prerequisites:
- Finish the Conversion Service on Windows Server or Conversion Service in Docker getting started guides.
- Install Postman client.
Additional Docker configuration
When you finish the Docker getting started guide, you have a docker-compose.yaml file with a configuration similar to the following:
volumes:
    vol-conversion-srv-app-data: {}
services:
    conversion-service:
        # Conversion Service image - Converts files to PDF format.
        image: pdftoolsag/conversion-service
        environment:
            # To activate the license, pass the value of the license key.
            LICENSEKEY: LICENSE_KEY_VALUE
            LICENSINGSERVICE: http://LGS_IP_ADDRESS:9999
            IMPORT_PROFILES: /etc/convsrv/ProfileExport-6.1.0.export
            SERVICE__OFFICE__TYPE: OfficeWebService
            SERVICE__OFFICE__USERNAME: YOUR_OFFICE_USERNAME
        ports:
            # Exposes port 13033 for external communication.
            - "13033:13033"
        volumes:
            - vol-conversion-srv-app-data:/etc/convsrv
            - C:/Users/john-doe/Desktop/ProfileExport-6.1.0.export:/etc/convsrv/ProfileExport-6.1.0.export
To enable the Simple API, include additional code nested under the services:
    connector-service:
      # Connector Service image:
      # Enables REST Input connectors, the REST input plain HTTP, and REST input JSON.
      image: pdftoolsag/connector-service
      ports:
          # Expose port 13034 for external communication.
          - "13034:13034"
Click to expand for more information. The complete example of the docker-compose.yaml with the added Connector Service:
volumes:
    vol-conversion-srv-app-data: {}
services:
    conversion-service:
        # Conversion Service image - Converts files to PDF format.
        image: pdftoolsag/conversion-service
        environment:
            # To activate the license, pass the value of the license key.
            LICENSEKEY: LICENSE_KEY_VALUE
            LICENSINGSERVICE: http://LGS_IP_ADDRESS:9999
            IMPORT_PROFILES: /etc/convsrv/ProfileExport-6.1.0.export
            SERVICE__OFFICE__TYPE: OfficeWebService
            SERVICE__OFFICE__USERNAME: YOUR_OFFICE_USERNAME
        ports:
            # Exposes port 13033 for external communication.
            - "13033:13033"
        volumes:
            - vol-conversion-srv-app-data:/etc/convsrv
            - C:/Users/john-doe/Desktop/ProfileExport-6.1.0.export:/etc/convsrv/ProfileExport-6.1.0.export
    connector-service:
      # Connector Service image:
      # Enables REST Input connectors, the REST input plain HTTP, and REST input JSON.
      image: pdftoolsag/connector-service
      ports:
          # Expose port 13034 for external communication.
          - "13034:13034"
Convert file using default configuration
Convert files to PDF/A-2 using the default Connection, Workflow, and Profile. There are two methods how you can call the Simple API using any Connection:
- REST input plain HTTP: Provides support for converting large files (larger than 100 MB).
- REST input JSON: Provides structured input and output in Base64 encoded format.
REST input plain HTTP
To convert a file to PDF/A-2 using the REST input plain HTTP:
- Download the Simple API Postman collection. If this link only opens a new tab in your browser and doesn’t start a file download, copy the JSON content in your browser into a file called
conversion_service_simple_api.postman_collection.jsonand save it. - In the Postman client, click Import, and then follow the steps described in the Postman client to import a collection.
- Optional: If the Conversion Service Configurator is running on a different machine:
- Specify its IP address in the Conversion Service Simple API folder > Variables.
- Next to the
baseURL, in the Current value column, change the value of thelocalhostto the IP address of the computer where the Conversion Service Configurator is running.
- In the Postman collection, open the Conversion Service Simple API > Archive PDF/A-2 > REST input plain HTTP.
- Click Body, and then next to the
datakey, add the file you want to convert in the Value field. - Click Send.
You receive a file converted to PDF/A-2 in response to this API call.
REST input JSON
To convert a file to PDF/A-2 using the REST input JSON:
-
Download the Simple API Postman collection.
-
In the Postman client, click Import, and then follow the steps described in the Postman client to import a collection.
-
Optional: If the Conversion Service Configurator is running on a different machine:
- Specify its IP address in the Conversion Service Simple API folder > Variables.
- Next to the
baseURL, in the Current value column, change the value of thelocalhostto the IP address of the computer where the Conversion Service Configurator is running.
-
In the Postman collection, open the Conversion Service Simple API > Archive PDF/A-2 > REST Input JSON.
-
Click Body, and then add your Base64 encoded file as a value of the
"content"parameter. For example:"content": "SGVsbG8gd29ybGQuCg==" -
Click Send.
You receive the file converted to PDF/A-2 in Base64 encoded format in response to this API call.
The REST input JSON endpoint lets you also upload files using a URL that you can specify in the request body. For more details, review REST input JSON API reference.
Convert file using custom configuration
In the Conversion Service on Windows Server or Conversion Service in Docker guides, we created a profile called an awesome-test-profile that adds a stamp to converted documents. Let’s use it again while we also configure a custom Connection.
The following sections are not available for Docker users. Using a custom Connection is only available on Windows and Windows Server. You cannot add a custom Connection to a Docker instance of the Conversion Service. To workaround this limitation, change the preconfigured archive-pdfa2-default Connection configuration. You can change its Workflow and Profiles.
Create custom Connection
Connection is a special term in the Conversion Service. A Connection is a set of various input sources (called connectors) and outputs. The Simple API is one such input source (connector) that you can include in a Connection. To set up a new Connection with the following steps:
- In the Conversion Service Configurator, click the Integration tab.
- Click Add.
- In the Name field, add a name to the new integration. For example: get-started-integration
- In the Processing section, click the drop-down list next to Workflow, and then select Archive PDF/A-2.
- Also, in the Processing section, click the drop-down list next to Profile, and then select for example: awesome-test-profile
- In the Input section, click Add.
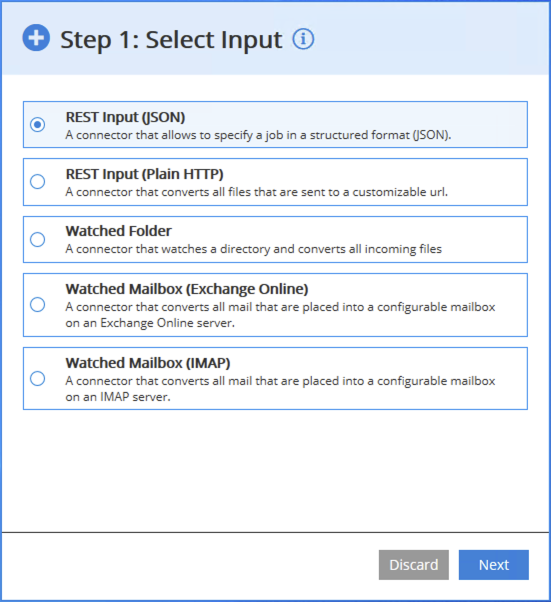
- Select REST Input (JSON), and then click Next.
- Optional: Change the auto-generated connection ID. For example: input-get-started
- Click the drop-down list next to Response, and then select Result.
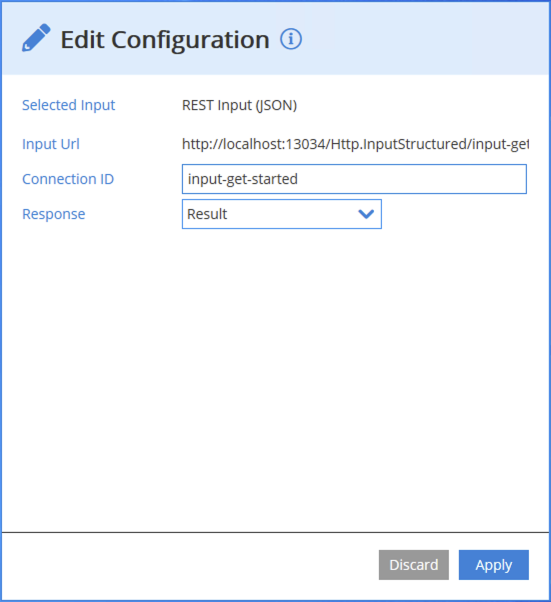
- Click Apply.
- Again, in the Input section, click Add.
- Select REST Input (Plain HTTP), and then click Next.
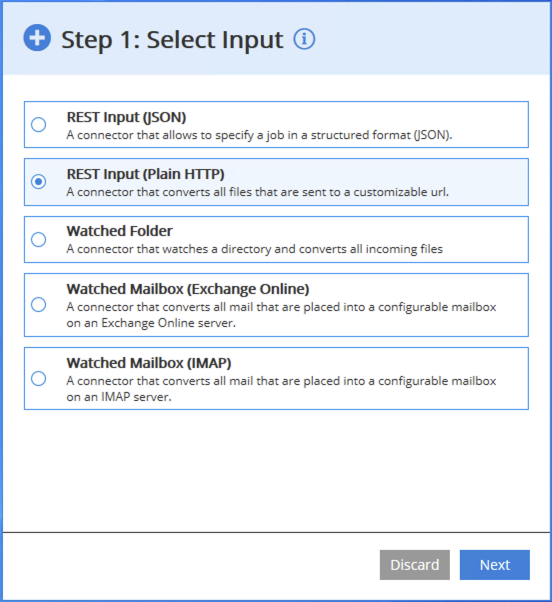
- Optional: Change the auto-generated connection ID. For example: input-get-started
- Click the drop-down list next to Response, and then select ResultFirst.
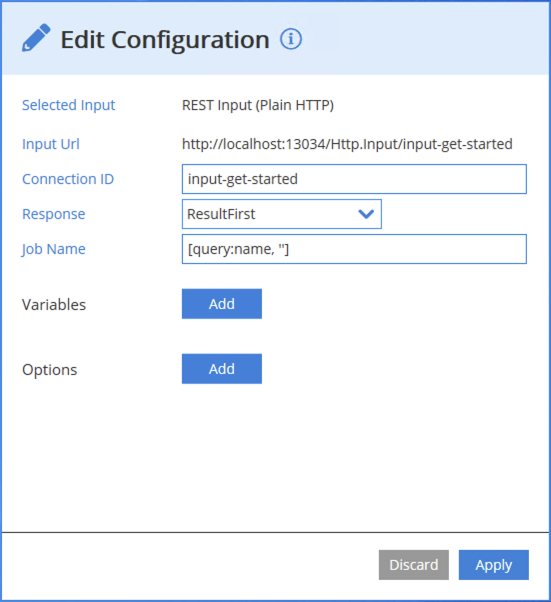
- Click Apply.
- Click Apply again.
- In the Changes detected dialog box, click Save & Restart Service.
Let’s convert files in the following sections using the custom Connection and Profile.
REST input plain HTTP
To convert a file using custom Connection and Profile, follow these steps:
- In the Postman client, go to Conversion Service Simple API, and then click Variables.
- Change the Current value of the connectionID to the connection ID you added to both the REST input JSON and REST Input HTML in the Configurator. For example:
input-get-started - Optional: If the Conversion Service Configurator is running on a different machine:
- Specify its IP address in the Conversion Service Simple API folder > Variables.
- Next to the
baseURL, in the Current value column, change the value of thelocalhostto the IP address of the computer where the Conversion Service Configurator is running.
- In the Postman collection, open the Conversion Service Simple API > Archive PDF/A-2 > REST input plain HTTP.
- Click Body, and then next to the
datakey, add the file you want to convert in the Value field. - Click Send.
In response to this API call, you receive a file converted to PDF/A-2 using your custom configuration.
To use a custom Connection, change the connectionID in the Postman collection to the value of the connection ID defined in the Conversion Service Configurator. The pre-configured value of the connection ID is archive-pdfa2-default.
REST input JSON
To convert a file using custom Connection and Profile, follow these steps:
-
In the Postman client, go to Conversion Service Simple API, and then click Variables.
-
Change the Current value of the connectionID to the connection ID you added to both the REST input JSON and REST Input HTML in the Configurator. For example:
input-get-started -
Optional: If the Conversion Service Configurator is running on a different machine:
- Specify its IP address in the Conversion Service Simple API folder > Variables.
- Next to the
baseURL, in the Current value column, change the value of thelocalhostto the IP address of the computer where the Conversion Service Configurator is running.
-
In the Postman collection, open the Conversion Service Simple API > Archive PDF/A-2 > REST input JSON.
-
Click Body, and then add your Base64 encoded file as a value of the
"content"parameter. For example:"content": "SGVsbG8gd29ybGQuCg==" -
Click Send.
You receive the file converted to PDF/A-2 in Base64 encoded format using your custom configuration in response to this API call.
To use a custom Connection, change the connectionID in the Postman collection to the value of the connection ID defined in the Conversion Service Configurator. The pre-configured value of the connection ID is archive-pdfa2-default.
The REST input JSON endpoint lets you also upload files using a URL that you can specify in the request body. For more details, review REST input JSON API reference.
API references
Get more details about the Simple API. Review the API references on the Simple API references page.