Get started with Advanced API
Learn how to integrate an API to reliably process the harmonization of documents from various sources and prepare them optimally for your intended purpose with a detailed configuration. Convert a file using the Advanced API Postman collection.
Prerequisites
To use the APIs explained in this documentation, fulfill the following prerequisites:
- Finish the Conversion Service on Windows Server or Conversion Service in Docker getting started guides.
- Install Postman client.
Convert a file
Convert a file using the default configuration with a Postman collection:
- Download the Advanced API Postman collection. If this link only opens a new tab in your browser and doesn’t start a file download, copy the JSON content from the tab in your browser into a file called
conversion_service_advanced_api.postman_collection.jsonand save it. - In the Postman client, click Import, and then follow the steps described in the Postman client to import a collection.
- Optional: If the Conversion Service Configurator is running on a different machine:
- Specify its IP address in the Conversion Service Simple API folder > Variables.
- Next to the
baseURL, in the Current value column, change the value of thelocalhostto the IP address of the computer where the Conversion Service Configurator is running.
- In the Postman collection, open the Conversion Service Advanced API > Job Processing > Create new job.
- Optional: Change the Profile you want to use for the file conversion. To use the custom profile created in the previous guides, open the Params tab, and then in the Value field of the profile key use for example: awesome-test-profile
- Click Send.
- Open Add data to job, click Body, and then in the Value field of the data key, add the file you want to convert.
- Click Send.
- Open Start job, and then click Send.
- Open Get job info, and then click Send. In the response, you receive the current status of the conversion processing.
- Open Get job result data, and then click Send. In the response, you receive the converted file.
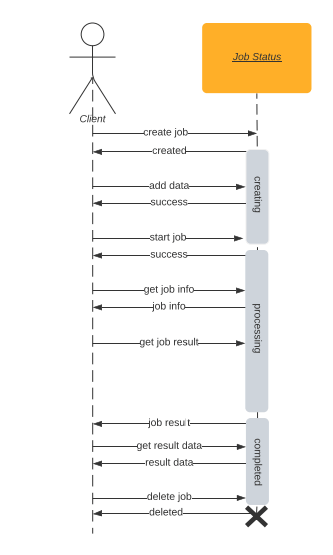
Explore the Postman collection and see which parameters are being parsed and copied to calls of other endpoints, especially the jobId. With the Advanced API, you can also upload files for processing stored in a URL (Add data by url to job endpoint), send converted documents to a URL (Store job result data endpoint), create many jobs for processing at the same time, list statuses of all jobs, delete specific jobs. The Advanced API let’s you implement the document processing workflow in great details.
In short, to schedule a job and retrieve its result, the sequence is as follows:
To learn more about the Advanced API, review Integrate through Advanced API page and Advanced API references.